Sunday, March 30, 2014

Art Journaling

Art journaling has been on my crafty bucket list for a long time.  I do have to admit, I have made several attempts, but never could quite finish a page.  I think that fear of it not looking like other ones that I have seen posted or on youtube made me a tad nervous to really try.  All I can say is I am glad I got over it.  I did recently take an art journaling workshop from Limor Webber online.  I cannot remember what her exact wording was, but she said it didn't even matter if it came out ugly.  As crafters we all want our creations to come out perfect, so letting go of that was a little difficult at first.  However, I cannot tell you how fun it is just to play and not really care what the outcome looks like.  I have really enjoyed doing them. 

Now confession, I enjoy doing the backgrounds way more than completing a page.  It is so much fun to just go for it and make an utter mess.  (At least for me :) )  I have not started with any ideas.  I have just grabbed something to play with and let it go from there.  It is the finishing it off part, that I have a hard time with but it seems like it is getting easier with each one.  Now keep in mind these aren't perfect, but I had so much fun creating them all.


 #1 A Beautiful Mind


Cut up calendar stickers from the TH Lost & Found Salvage Stickers into various sizes. Stuck to a piece of 8 1/2 x 11 paper. Sprayed Lindy's Stamp Gang Chocolate  into gesso and created a thin wash over the stickers.  It gave it tooth.
Sprayed Lindy's Industrial Chic and Chocolate all over the background and let dry.
Embellished, stamped. inked, and splatter sprayed.  Highlighted edges with paint pen and smeared. All the gears. clocks, and title were cut using the silhouette and then inked, stained, embossed, etc.

The washi tape wasn't part of the design but the paper started to tear so I am using to hold together.  Using a thicker spray instead of a flat Fabio corrected the issue for later pages.


#2Create your Own Destiny.


Covered sheet in gesso. Then second coat pouncing to create texture.  Splattered alcohol inks all over direct to paper and then sealed with clear gesso.
Created a wash with a blue gelato and water and went over white areas. Stamped randomly.
Tore strips of script paper and inked to break up the background.  Added embossed circles in various sizes.  (Hated the yellow, covered with white gesso then ended going over it with a red gelato.


#3 Feeling blue.  (There is some personal journaling on this one so I am not showing the full layout.


Gessoed then covered in gelatos.  Created different textures with the gelatos. Stamped and inked over.

#4 So Not a Fashionista
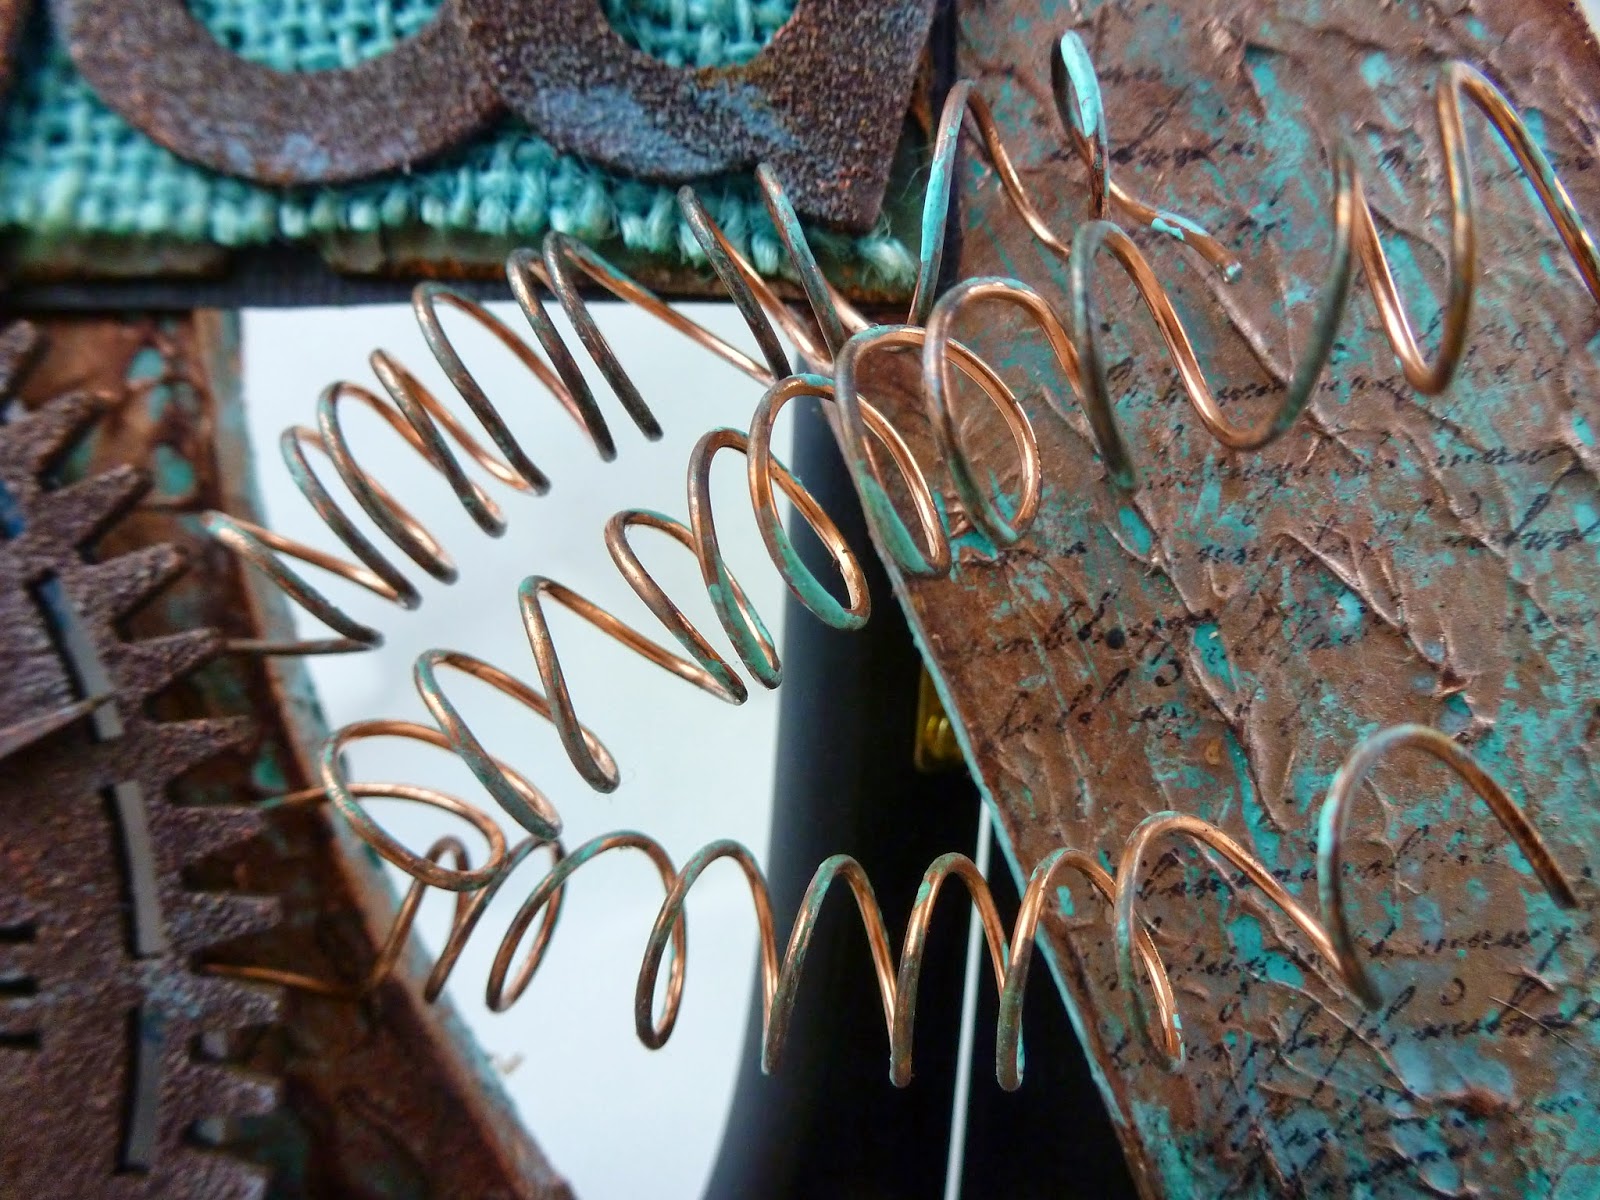


Faux batik technique with a twist.  Rusted egdges, inked, paint, splatters, etc.

#5  Heart
Paper backgrounds, acrylics, paper pleating with lindy's Cattail Copper Brown, antiqued hearts.  Rusted elements added.


Money Saving Tips:
Signo Uniball White Gel pen is the absolute best white gel pen that I have ever tried.  Craft Smart paint pens are excellent and cheap. Shop the kids section of art supplies.  I have gotten water color and mixed media paper for 1/3 the price and works just as well.  Gel Sticks by FaberCastel are the kid version of Gelato's and they are completely the same, just not as many colors.  I got this tip from the Frugal Crafter on YouTube...tried myself and it is true.   12 pack of gel sticks 9.99, 4 pack of gelatos are the same price. 


r

Saturday, March 29, 2014

Antiquing - A quick tutorial

There are quite a few methods to give an antique effect.  For me simpler is better.  I like instant gratification with minimal steps and work if possible.  I have tried several products and always go back to the one made by Plaid...simple, easy, and cheap.  It is around 2.50 for a 2 oz bottle.  So worth it. 

I started off making a some collaged hearts.  I cut hearts in various sizes using the silhouette.  Tore some paper into smaller pieces.  Adhered them to the hearts and sealed with Golden matte medium.  Then let fully dry then trim.  It doesn't take long at all.


Paint on generously a coat of Antiquing Medium by Plaid.  Then wipe off with a paper towel in a circular motion.  It will leave your papers with a darker tint and a more unified look. 


To achieve similar looks you could do a light wash (make sure your project is well sealed first).  Mix in one part paint to 3 parts warm water and mix well.  Brush over project.  Let dry, repeat as many times to get the darkness you wish.  I tried the Martha Stuar tinatable antique effect...much more expensive than the plaid and didn't like it very much.  I might just need to play with it more.  I did like that when I painted over a darker surface with a lighter color mixed with the medium then blotted it off, I did like that.    To finish off I inked the edges with Dark Bark Prima Chalk Edger. 

(Sorry not great pictures....did this before I started trying to use the light tent ) 


You win some and you lose some

Ok, I am just going to make excuses and say I was a little off my game and blame that this was one of the first projects I did after fracturing my hand. However, we all know that it is just rubbish.  In creating, sometimes we make things that we all get giddy about and cannot wait to share with others.  Then there are creations, that we want to take and hide in a corner and never speak about again.  Well this is one of those creations. 


In my head, I had this wonderful piece all thought out.  I had this little armoire that I had picked up from a thrift store for a whopping .99 cents. So I guess I cannot cry too much.  I decided to alter it finally as I have had it probably for two years.  Oh I had grandiose plans for this one.  It was going to be my masterpiece - lol.  Not even close. 

Road block number 1 - most all of the screws were stripped so getting the doors off was quite a challenge.  Forget taking the hinges off the armoire all together (this plays a part later on).  So I went through with the plan and got the armoire all done.  Not perfect, but decent enough.  Then came putting the doors back on.  Whoops.  I had added so much paint and texture that ones the doors shut....they wouldn't open back up.  Sealed shut I tell you.  So the plan was to get them off and sand them down.  Oops again.  Damaged the doors when taking them off.  They were layered chipboard under all of that - go figure. 

I had two options.  I could through the dang thing in the trash which was where it was headed.  Or find a plan B.  I did want it as a functional item to hold mediums so they weren't just rolling around on the desk.  After stewing for a while and pouting quite profusely, I decided to ditch the doors and leave it open.  Well, there came the next road block - never was able to get the hinges completely off from the inside because of the stripped screws.  Then the incredible hulk moment kicked in and yanked them off.  Amazing what you can do when your determined and little ticked off.   (Normally I am so not this way)

Doors were  off, now to mask my boo boos.  I had to cover the spots where the hinges were (thus the gears in the front)  I don't hate the final piece, it just isn't what I imagined it to be.


Altered Ampersand

I purchased a wooden ampersand from Michael's.  I had seen an idea off of SVG cuts where they did the you and me on it and decided I would use that as inspiration.  It is definitely did not come out anything like theirs, but comes to show how you can get inspiration and make things your own. I had no other plan for it other than knowing I wanted to possibly add a photo to it of Josh and I and hang it in my craft room.

 
Texture.  I love texture.  I covered the entire front and sides in a coat of modeling paste.  I tapped my finger up and down all over to create the texture.  I let dry overnight. You certainly don't need to let it set that long, but I usually don't have much time to craft so sometimes I try to fit the little steps in on a weeknight so I feel like I have accomplished something.  

TIP - for the next step (Read the directions first before using something you haven't done before - LOL)  I have used the modern masters iron paint and rust activator many times so I thought that the copper and patina would be the same (NOPE - lol).  I have a separate tutorial listed under another post. 

Paint with one coat of copper.  Let dry, then paint second coat.  While wet, add patina.  The amount of patina you add will be based on how much of your piece you want to have the patina effect.  The copper paint will eventually patina over time, the patina coat just speeds up the process. 

I stamped with a black script stamp all over to give another layer of visual interest. I used a brown ink bad to edge the piece and hit some of the high points.

All of that part came easy.  The part I got stuck on was finishing the piece.  I went through about 5 or more sets of letters before deciding on these.  I love how they came out.  Simple too.  Chipboard letters.  Inked brown.  Embossed over the top with TH Vintage Photo distress embossing powder.  Added a little copper and patina gilders paste as highlights.  I layered them onto my mats.  The mats are black cardstock, scrap paper I had distressed, inked and sprayed,  and sprayed burlap.  I finished them up by making copper coils that I beaded and taking a cutesy button paperclip and inking the heck out of it.  

The clock was super fun.  I used a chip board clock and did the same treatments as the letters.  I backed it though with piece of paper that I sprayed with Lindy's Tibetan poppy teal.  The coils are out of 16 gage wire that I wrapped around a paint brush handle then just added a little gilders paste to add a little patina.  I will add the picture as soon as I pick the one I want to display.


Tuesday, March 11, 2014

Assemblage

While I was out of commission, I was able to surf the net.  I came across this site frogdogstudios.com.  They have mixed media kits, so I decided to try a month to see if I liked it.  I ended up getting the February and March regular kits, the March add-on, and a few extra goodies.  One of the items in the March kit was rusting powder by Dusty Attic.  I have to admit I was a bit of a skeptic as I love my rust and I am a faithful user of the Modern Masters Metal Effects Iron Paint and Rusting solution.  I decided to just play with it on some altered altoid tins.  It was very easy and much faster time to prepare than the MM brand.  (Just paint your tin with glue - I used modge podge, sprinkle on the powder, spray with white vinger, and wait 15 minutes).  Easy peasy.  (However, I do not like the smell of the white vinegar and it smelled to me like bad easter eggs).  Well worth the smell though.  The out come was a beautiful rusted piece.

I had rusted the back of the tins as I wanted to see the type of coverage hit had.  I couldn't bear to have it hidden so instead of putting them both open side out, I turned the top one around.  I used the TH Ideology stickers from Lost and Fount , the k letter press block, and the  from the march kit, and the altered domino from the February kit.  From my stash I added the sand, bottle, twine, idealogy metal pieces, shell, and gilder's paste.  I added a little more ink with the prima dark rust ink pad and stamped with the tim holtz honey comb stamp in black randomly around the tin and on the front.  The word strip has rusty hinge distress paint rubbed across the letters to help them stand out.


Monday, March 10, 2014

Altered Art Journal

So here is the First A project - Altered Art Journal. 

I have been wanting to do an art journal for a while.  I will say I have been a little bit intimidated.  I see all of these amazing pages on Pinterest, You Tube, Facebook, etc.  The thing is how do you get better at something....you jump in with both feet and just do.  As we do, we grow in our abilities and just get better with practice.  I have picked up a couple of journals over time and decided that I wanted to focus on the smaller one.  the pages are 5 1/2 x 8 1/2.  I had seen some videos on youtube where France Papillion does it on an 8 1/2 x 11, cuts in half and then puts it into the book.  I figured this would work perfect for me.


Started with a wire bound art journal.  I loosend the rings and slipped off of the covers.  I love that the journal had a texture already to it similar to canvas - bonus.  Painted with gesso and let dry.  Using a lattice and script stencils, I covered most of the surface with embossing paste. I layered on pieces of punchinella and snippets of dry wall tape randomly on the pages.  I cut tons of clock and gear cuts using the silhouette and 65 lb cardstock.  Then painted over the surface with another coat of gesso.


I then sprayed the heck out of the covers with Lindy's sprays.  Of course Tibetan Poppy Teal and Cattail Copper Brown were the main ones.  Then I followed up with gilder's paste, dry brushed with burnt sienna acrylic paint,  then smudged a black ink pad over sections.  


 Finishing touches: Added chunky aged embossing powder around the edges of the book.  Cut a welded title from silhouette 3 times and layered.  Embossed with a square patterned embossing folder.  Embossed in black utee.  Used rust gilder's paste to add color.  I did the same thing with the clock hands.  Layered those with clock gears.  Then I splattered the covers with a bit of black paint. I added dcwv steampunk papers to the inside covers to finish off.