Wednesday, December 28, 2016

Alice in Wonderland ATC's for Creative Embellishments

Hello all.   I had some fun with some Alice in Wonderland ATC's with a steampunk twist.   I used the G45 paper collection along with the some Marion Smith papers for the base of my scenes.  I have 9 pieces in total to fill a pocket letter.  So matted each with black card stock that I edeged with a bronze Wink of Stella pen and a Tim Holtz stencil.


With the images, I added some quotes from the book itself and some stickers from the paper collection. To add depth,  I added chipboard embellishments to each scene.  I didn't have size I wanted in some of the pieces so I did a little improvising and some chippie surgery.  This is a good way to use left over pieces from a pack of embellishments after finishing a project.  On the Rabbit, I used a clock hand from the clock hand snowflake.  I will be able to use the rest of the chippie in another project so this worked perfectly as it was exactly the size I needed for the Rabbit to be standing on.   For the Queen of Hearts, I had to do a little more surgery with the Steampunk Heart with Wings.  I was careful to keep the wings intact as I removed them so that I could save them.  The hear then was inked and trimmed to size.   For the Cheshire Cat, the branches were a little to big but I created the perfect size from a left over Seaweed 2 chippie that I had cut down from a previous project.


Sunday, December 25, 2016

Last minute gift idea for the Creative Embellishments blog


Hi all.  I am up on the Creative Embellishments blog today with a last minute gift idea.  Do you ever have those uh oh moments when someone at work gives you a gift and you have nothing for them in return?  Or you want to give some a token gift but don't have the budget to go all out?  This is a great little gift that could be customized with different papers and embellishments throughout the year to fit any occasion. 


I took a king-sized Hershey candy bar and wrapped it in some Tim Holtz papers.   I used a paper punch on the ends so that the silver from the candy bar wrapper would show through.  I added some stickers from an old Christmas paper pack to add the sentiment and image.


I chose snowflakes to embellish my bar as inspired by the main paper I used.   I wanted a different color so that it would stand out against the paper.  I sprayed the clock hand snowflake in Krylon glitter blast spray paints.  Giving each piece two coats.  I love this stuff.  You keep the detail of the pieces and the shine of glitter without having to deal with the mess of glue and loose glitter.  I finished off with a little blue flower from my stash.  I adhered this  to the candy bar with a little foam tape so that I could tuck a little gift card underneath.  

If you haven't checked out the Creative Embellishments store, she has some amazing chipboard embellishments along with would veneers, stamps, stencils, and flair.  CreativeEmbellishments.com.

Happy Holidays Everyone!

Monday, November 28, 2016

Tag book for Creative Embellishments

Hello all.  I decided to go grungy again.  It is so my favorite.  I wanted to give a Tim Holtz tag book a little make over.   I plan on creating some technique tags for inspiration when creating for those crafter's block moments. 


I painted the book with a couple thin coats of gesso to prep the surface.  I used a thin layer of embossing paste and then heated with a heat tool until bubbly and uneven.  I love this technique.  If you want your embossing paste to be uniform in consistency, it is better to air dry.  This technique though gives incredible texture very easily.  Lots of nooks and crannies for paints and sprays to settle.  Once dry, I added my chippies.  I used the steampunk pipe corner as my main image.  I layered it with gears and loose parts.  I used for the upper right hand corner another piece from the loose parts and gears package along with a propeller.   Since this book is to be used to provide me inspiration, I used the inspire chippie from the Inspiration word set for my title. I used some flat backed gems for the rivets. 


After everything was adhered and dried I painted black.  (Tip:  I did not do this step and so regretted it after - paint a base layer of black before adding your chippies and other layers.  If you have detailed chippies, give them a coat of paint to before gluing down. Then do another layer of paint after.) I then decided to go over it with brown, teal, rust, and orange colored sprays.  The camera doesn't pick up tall the shades of the sprays - but in real life it is really cool.  Depending on how the light hits the colors really pop.  I went over areas of the book in metallic paints to bring out the chippies. 


Friday, November 25, 2016

Steamy Love Canvas for Creative Embellishments


Hi all.  Hope you had a splendid Thanksgiving holiday.   I decided to get a little painty today and try a faux batik technique.   I prepped a canvas with gesso.  Once dry,  then embossed with white embossing powder through a stencil.  I took metallic paint in patina, a blue green, and a pinch of copper penny and dabbed it over the canvas.  Using a piece of scrap card, I scraped the paint across the canvas.  Once almost dry I used a paper towel to buff and remove the excess paint from the embossing powder.


For the steampunk heart 2  I prepped it with a layer of rusty hinge distress stain.   This chippy is so detailed and I didn't want to cover up the fine details.  I just highlighted some of the details with metallic paint and some brown ink.   I added a gear and some propellers.  Something about steampunk just makes me smile. 


I layered the heart over these fab wings that I sprayed with a gloriously glittery metallic spray.  I finished off the mini canvas with some ink around the sides, a ceramic love word from Prima, and some enamel brads. 

Thursday, November 24, 2016

Chipboard Canvas for Creative Embellishments

Happy Thanksgiving everyone. I am up on the Creative Embellishments blog today.  You should check out their store as they have some amazing deals going on. 

I was looking around my craft room an noticed my paper cubes are a bit plain.   I have been putting off on painting them as I am thinking of changing craft room colors.   So I thought it would be fun to make a light weight canvas to hang on the side to give it some temporary style until I make the change.   I cut a piece of chipboard down to 8 x 8 and added some Tim Holtz distressed grungy paper for a base.   I decided to build up visual layers in order to keep the canvas light.  


I used the distressed brick stamp randomly in a sage green ink across the canvas.  I followed it with using a patina color ink with the distressed text stamp.  For my last layer of stamping I used my new favorite stamps, the halftone circle stamps in patina and chocolate brown. Let me tell you these stamps are so detailed an amazing.  To add more layers I used the harlequin lattice and the mini circle panels as stencils.   They worked beautifully, plus I still have the panels to use on another project.  Love getting extra use out of my supplies.


I used a teal spray on a grunge circle frame to highlight my quote.  I edged it with ink and paint along with embellishing it with some painted washers and a propeller.  I added an image from my paper stash along with a few little metal embellies and a few splashes of paint. Time to hang it on the cube with some sticky tac.  Have a wonderful day.

Friday, October 28, 2016

Believe Canvas for Creative Embellishments


x4


Hi all.  Kelley here with a canvas panel today.  I started off with a canvas panel and created some texture.  I slabbed on a thick layer of modeling paste through a stencil pulling up a bit.  Once it dried I added layers off different metallic paints.  I added some black ink to the center to bring out some of the texture.  I then inked the edges unevenly with a versa mark pad and heat embossed with chunky black embossing powder to create a frame.

x2


For the chippies I started both off with a coat of black ink.  For the steampunk butterfly,  I added a layer of Golden Doubloons and Tibetan Poppy Teal sprays  followed by some brown ink.  I wanted to keep the embellishments of the chippie simple as the details on the chippie are amazing.  It is so gorgeous as it is. I finished it off with some metal bits and bobs from my stash just to highlight my favorite areas.  I added some of the teal spray to the word believe from the inspire word set.  This was a fun piece to make for my craft room wall.


x1

Monday, October 24, 2016

You have been Boo'd for Creative Embellishments

Hello all.  Kelley here with a boo treat box.  We are doing a "secret santa" Halloween Style.  We are to make or purchase a simple container and fill it with treats.  Then when your "secret person" that you are supposed to Boo is away from their desk - you sneak them their treats.  How fun is that?


I absolutely love the Graphic 45 Rare Oddities.  I thought it would be perfect for this project.  I used a Silhouette cut file to cut the box.  I kept it simple but added a cut out of the paper to frame the word "BOO."  I ink the letters from the Gooey Alphabet set in Ranger Grape Soda ink.   I love the deep color.  It goes so well with the letters.  

I finished off the box with some dyed cheese cloth, a skull and some treats.   I cannot wait to get my little box.  This should be fun.  

Wednesday, October 19, 2016

Envies for Creative Embellishments


Hi all  I am up on the blog for  Creative Embellishments today.  I was skyping with a friend from Australia.  We had been talking about different crafts we have made for each other.  She had mentioned some envelopes that I sent her with some goodies last year that she really loved.  I decided to make a few more for her as they are super fun to make for her Christmas box.


I started off with craft envelopes and then sprayed with different sprays in orange, blue, and brown.   I then stamped in brown ink with my favorite Creative Embellishment Stamps: Distressed Brick Stamp, Distressed Script Stamp, and Distressed Text Stamp.  To Finish off the background, I edged the envelopes in brown and black inks.  Then I added a few black rub-ons.


This project is perfect for using some left over bits and bobs.  I used cheese cloth and some scrap papers to provide a base. Then I added some fun chippies.  For the first envelope I used the lace border  and dress form chippies.   I used the live chippie from the happy word set for the second envelope.  For the last envie I used the faith chippie.

Tuesday, September 20, 2016

Altered burner cover with Kelley

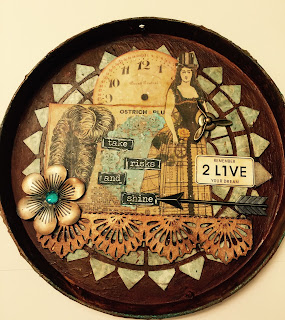
Hi all.  Hope you are having a great week.  I am up on the blog for Creative Embellishments today.  I have been inspired by circle journals and canvases.  The only thing is circle canvases aren't always easy on the budget.  Solution?  How about a set of burner covers from the dollar store.  I love how versatile they are.  Two covers for a $1.oo - how awesome is that?  You can use either the inside or out. 

I painted the cover with two coats of gesso, then two layers of iron paint.  Once the paint was dry I added the rust activator spray.  I used the inside cuts of a doily to create the background.  I wanted it to tie in with a tool tray I had made before. I fussy cut pieces of patterned paper and inked.  Distressed a doily with sprays. 


To anchor everything I used the amazing lace border 1 chippie.  Let me tell you - it is awesomely detailed. I painted it copper, added a coral shimmer spray, then added depth with rust and dark brown ink pads.  So love it. 

Sunday, September 18, 2016


Hi all. Kelley here with a an altered frame.   The inspiration for this frame has been life lately.  I find myself saying if I just had more time, I could craft more....if I just had a larger craft
room, I would be more organized....if I just ...and so on. I realized I have been saying this quite a bit.  I needed to take a step back and remind myself to be happy for all the good in my life.  I can be happy that I don't have tons of extra time because I have a job and a wonderful son.   I can be happy because even though it is small, I do have a room to dedicate to craft supplies.  I can just be happy for all of my blessings.

As a reminder to just be happy with what I have in my life I decided to make a simple frame.  I wanted the main focus to be the message.  I plan on putting this in my craft room so I went totally grungy for the background.  I decoupaged some Tim Holtz papers onto the frame.  I smooshed on rusty hinge and vintage photo distress paints to blend the papers together and push them back in the background. I added black, brown, and white ink to the frame.  I made white and black marks as well. 


For my new mantra, I spelled it out using the chunky alphabet set and the word happy from the happy word set.  I used a light coat of a coarse texture gel to give it a rough feel.   I then used black ink to coat the letters.  I added a tiny bit of the white to tie into the frame.   I added a piece of the paper for the inside of the frame until I find the right picture of my son and I to put into it. 

Wednesday, August 31, 2016

September Challenge for Creative Embellishments

dreamstime_xs_32096973

Hi all it is time for the challenge over at the Creative Embellishments Blog for September.  The challenge for this month is to use a clock.

Here is my take:

A friend of mine is celebrating her birthday soon.  She had asked for a box to keep her wedding ring in as she takes it off at home before going to the gym.  After looking for the ring several times, she thought it would be best to have a safe place to keep it.  I thought the woman in the wedding dress from the G45 collection along with the 3" clock from this month's challenge represented timeless love.  She is more girly so I try to bring in elements that represent her style with the flowers and pearls.  I inked the clock in brown ink then brushed with white.  I used the word love from the happy word set and inked it in white ink and brushed over with brown.


Tuesday, August 23, 2016

Fairy Box for Creative Embellishments


Hi all, I am back with another project for Creative Embellishments.  If you don't know who they are or haven't seen their products, you have to check them out.  They have the most amazingly detailed chipboard embellishments, along with stamps, flair, wood veneer, and stencils.  Their website is CreativeEmbellishments.com.  You can click on the link from their store to check out their blog as well to see these great chippies in action.

IMG_0097 (1) - Copy
For today's project I made fairy shadow box.   I used a little gift box bottom I had in my stash and repurposed it.  The border from Once Upon a Springtime from G45 fit the outside of the box perfectly.

I used the fern foliage 2 chippies from Creative Embellishments.  Not only are they cute and detailed, but they are not too fragile to take on lots of ink.
FullSizeRender (40) - Copy
I fussy cut the scene and the grass out of the patterned paper to build the scene.  The ferns blend in so well with the scene.  This was really fun to make.

FullSizeRender (41)

Thursday, August 18, 2016

Altered Doorhanger for Creative Embellishments

Hello all.  Kelley here with an altered door hanger for Creative Embellishments.  I have been wanting to make one for some time to add a little flair to my craft room door.  I pulled out some paper from Bo Bunny I have been hoarding for a while and some of my coveted chippies and went to town.
I layered two of the steampunk dress form 2 chippies so that I could lift the wings of the top layer to add dimension.  I added loads of gears and a propeller.  I painted with copper and rust paints.  I went over with patina. I added some light blue paint around on the elements to tie in.
To finish off the tag I added a prima metal wing nut, pearls, flowers, and metal flourish butterfly. It was a really fun project to make.

Friday, August 12, 2016

Rusted Paintbrush for Creative Embellishments


Hi all.  Kelley here with a rusted paintbrush for Creative Embellishments.  If you love chippies as much as I do, you have to check out their blog at CreativeEmbellishments.com/blog and their online store at CreativeEmbellishments.Com.  I love her amazing selection and have been such a fan for a long time. As for the paintbrush, I started off painting the entire brush with two coats of iron paint including the bristles.  I then added the rusting solution and let it dry overnight to let the magic happen.  I love that you get different shades off rust from the very light to extremely dark.  I added embossing using a script stamp and black embossing powder.  I added blotches of blue, white, rust, black to give it some interest.


To embellish the paint brush I started with sticker strips from the G45 Steampunk Debutante collection.   I painted the mini dress form with various colors of Lumiere paints in a mottled fashion to create texture and a variation of color.  I still wanted to let the beautiful engraving of the chippies stand out so I made sure to highlight with the copper color. I have to tell you the level of detail in these chippies are amazing.  For the large 1 1/2" gear I used more Lumiere paints and then added black and rust inks.  I topped the brush off with a dyed ribbon.  I hope you all have fun creating.

Monday, July 25, 2016

Grungy Steampunk Watercolor Brush Cup for Creative Embellishments

Hi all.  Kelley here for Creative Embellishments.  I had taken such a long break from crafting that I forgot just how much I enjoy getting inky and messy.  I wanted to branch into playing with watercolors and purchased some materials.   I am so hard on my acrylic brushes that I wanted to make sure I kept my new watercolor ones safe.   I found this tin in my stash and thought it would be the perfect cup to hold the brushes.  It just needed a little love.   

I knew I wanted to use a clock face and wings, but due to the small size of the cup the proportions were to big for everything to fit on the front.  While I figured that part out, I covered the entire thing in strips of tape in vertical and horizontal directions, making each strip a different size.  I purposely left wrinkles in the tape to add texture.  I covered with coarse texture gel and then when dry, painted with black paint.   One thing I love about these chippies is that they can be coaxed to bend around corners without cracking or breaking.   The key is to move it slow and the wet matte medium helps loosen the fibers as you bend.  I used the Large Clock Face 4", Wings Set 3, Gear 1 1/2" , Gears 1", and loose parts to layer to the front and around the sides and then painted black.

After everything was dry, I thought it needed even more texture....I had scrap piece of the fishnet panel left over from another project and put some texture paste through it.  When I lifted up the panel piece I got this wonderful imperfect texture.   I still have the piece to use on another project but got a very unexpected but happy additional use out of it.  I covered the entire thing with Dr. Ph. Martin's irridenscent calligraphy ink in copper.  A few drops go a super long way.   I sprayed with some Lindy's stamp gang sprays in brown shades to tone down the shine.   I used just a couple of drops of the Jade calligraphy ink to add highlights and color to the back of the lightbulb.

Tuesday, July 12, 2016

Under the Sea with Creative Embellishments


Hello.  I am back up on the Creative Embellishments blog today with a new project.   Love the all the steampunk and sea themed items.  It pairs so well with the Graphic 45 collection.  Click on the links to go directly to the blog or the store to check out the items.

I found this cool latern over a year ago and have been saving it for a fun project.  When I saw the steampunk Octopus I knew I needed to do an aquarium with the lantern. I first inked the Octopus with amber liquid acrylics from Dr. Ph Martins then sprayed with coral Heidi swap mists.  I used dark bark prima chalk edger and a rust ink pad to darken the edges.
I used seaweed 2 and seaweed 3 to build out my acquatic seen inside the lantern.  I used the rust ink pad to ink the one to give it more of a coral feel and different shades of green and rust for the other.  I added sand, shells, and netting to finish off. 


Thursday, June 30, 2016

July Challenge for Creative Embellishments

Happy July everyone.  It is great to be back at Creative Embellishments. Check out their blog for their new challenge for the month of July.  The twist this month was to incorporate stars.  I made a banner for a table decoration for our festivities scheduled on the fourth.  I used bold red, white, and blue colors. I love those little wooden stars and they were so fun to color.  I used a navy blue Sharpie for the blue stars, a red Viva Décor Pearl pen for the red, and Picket Fence Distress Ink for the white. Have a happy and safe Fourth of July and I hope you were inspired to make a decoration for your party.